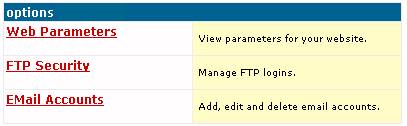
Simply double-click on FTP SECURITY.
On the next page click on your logon name. This will take you to
the main password screen (refer to the image shown). 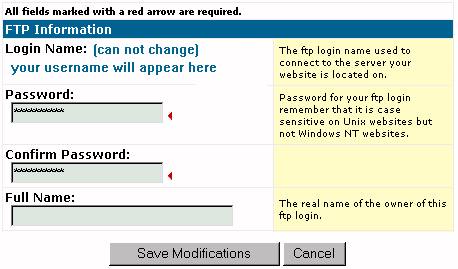 Here
enter your desired password twice and then press SAVE MODIFICATIONS.
Here
enter your desired password twice and then press SAVE MODIFICATIONS.
Note: this will change your main website
account password as well as the control panel password. This will
not change your main mailbox password. For that refer to the section
below. Make sure to write down your password for safe keeping.
The Full Name field is optional. Just enter your full name in it
(ie John Doe).
After changing your main account password you
may need to logon to the control panel again. You may have to shut
down your web browser and re-load to accomplish this.
Note: All Passwords must be at least ten digits long and contain
numbers and number and lower case letters for security reasons.
Changing an email box password:
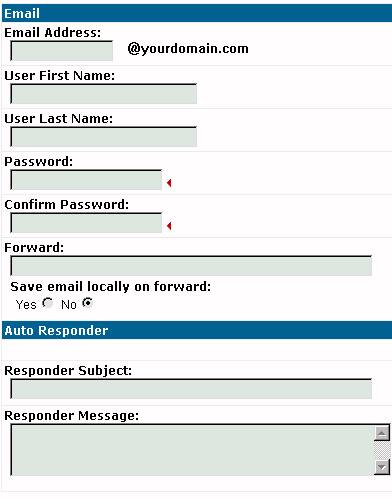
Click on EMAIL ACCOUNTS, then click on the email address in question.
You will see a screen of the current box settings. At the bottom
of the screen click on modify. On the next page enter your new password
twice as requested. Click on save. Your done.
 Adding
an email box: Click on EMAIL ACCOUNTS.
Click on the CREATE EMAIL tab. On the next screen enter your email
box name (for example: rabbit),
the first and last name of the person who will use the email box, the password
of the box twice. Leave everything else untouched and press Save.
Your done....the email box of rabbit@yourdomain.com
is now active!
Adding
an email box: Click on EMAIL ACCOUNTS.
Click on the CREATE EMAIL tab. On the next screen enter your email
box name (for example: rabbit),
the first and last name of the person who will use the email box, the password
of the box twice. Leave everything else untouched and press Save.
Your done....the email box of rabbit@yourdomain.com
is now active!
Note: in the above example we create email box rabbit@yourdomain.com.
Let's assume for the sake of the example that your domain name is peter.com.
Users will now be able to send to the box rabbit@peter.com and you can
tell friends to email this box. However, note that when you use an
email program to retrieve email from the box, you must use the following
format in the POP username of:
username%hubbardhealth.com
for example:
rabbit%peter.com
Delete an email
box: Click on EMAIL ACCOUNTS. In
the DELETE column click on the X next to the email address you want to
delete. You can not delete your main account mailbox. Please
do not attempt to do so or you will corrupt your email system.
Create an email alias:
An email alias is basically a name, such as anynamehere@yourdomain.com
which points to a physical mailbox or is forwarded to an external email
address off of our servers. It is not a mailox itself. Email sent
to this alias goes to the location you specify automatically. You
can create as many aliases as you want and point them wherever you want.
If you want to create an alias that points to
an existing email box on the server, click on EMAIL ACCOUNTS, then next
to the aliases column of the email address in question hit on the edit
link. This will allow you to create the alias name. For instance,
you can enter the alias of tiger on top of mailbox sprite@yourdomain.com.
Thus anyone emailing tiger@yourdomain.com will be redirected to the sprite
mailbox.
If you want to create an alias that points to
an external email address (not on our servers) follow the procedure for
ADDING AN EMAIL BOX above, except int his case enter the address to forward
to in the forward field provided and click on "NO" when you are asked to
saved mail locally. You can forward to multiple addresses by seperating
them by a comma in the forward field.
Forwarding email:
You can forward an email address to an external mailbox off of our servers.
To do this, click on EMAIL ACCOUNTS, click on the email address in question,
click on MODIFY, then enter the email address to forward to in the empty
FORWARD field. Email will now be redirected to the address to specify.
To forward mail AND seve mail to a mailbox then click on the YES field
when asked to save email locally. Note, if you select YES email will
collect in your mailbox as it normally would and be copied to whatever
forwarded address you select.
To forward to multiple addresses simply enter
them in the forward field seperated by a comma.
Autoresponder control:
An autoresponder is an email alias that automatically sends text information
to a user that emails it. This is very useful in business situations.
For instance, if you have a price list that you email customers, you can
create an autoresponder named pricing@yourdomain.com. Every user
that emails this address will be sent your price list automatically by
email saving you time and getting your users information in a blink.
To set one up, create a MAILBOX as you normally
would (see above), for instance pricing@yourdomain.com, except fill in
the autoresponder fields at the bottom. Your done! Your autoresponder
is now active!
 To access your control
panel point your web browser to the following address:
To access your control
panel point your web browser to the following address: